Jammed Toe: Comprehensive Guide to Symptoms, Treatment, and Recovery

It starts with a sudden, sharp jolt of pain that immediately commands your attention. Whether it happens when you stub your foot against a heavy piece of furniture, misstep during a quick sprint, or catch your digit awkwardly while playing basketball, a jammed toe is a surprisingly disruptive injury that most people underestimate. The immediate aftermath often leaves individuals hobbling in discomfort, unsure whether the damage is minor or requires urgent medical intervention. Because toes contain a complex network of small bones, delicate ligaments, tendons, and nerve endings, even a seemingly simple compression injury can trigger significant localized swelling and temporary mobility limitations. Understanding the underlying mechanics of this common foot trauma, recognizing the clinical warning signs, and applying evidence-based self-care strategies can dramatically accelerate your recovery timeline and prevent long-term joint complications. In this comprehensive guide, we will explore the anatomy of toe injuries, differentiate between sprains and fractures, outline proven first aid protocols, and provide actionable rehabilitation exercises that restore natural movement patterns safely and effectively.
What Is a Jammed Toe and How Does It Occur?
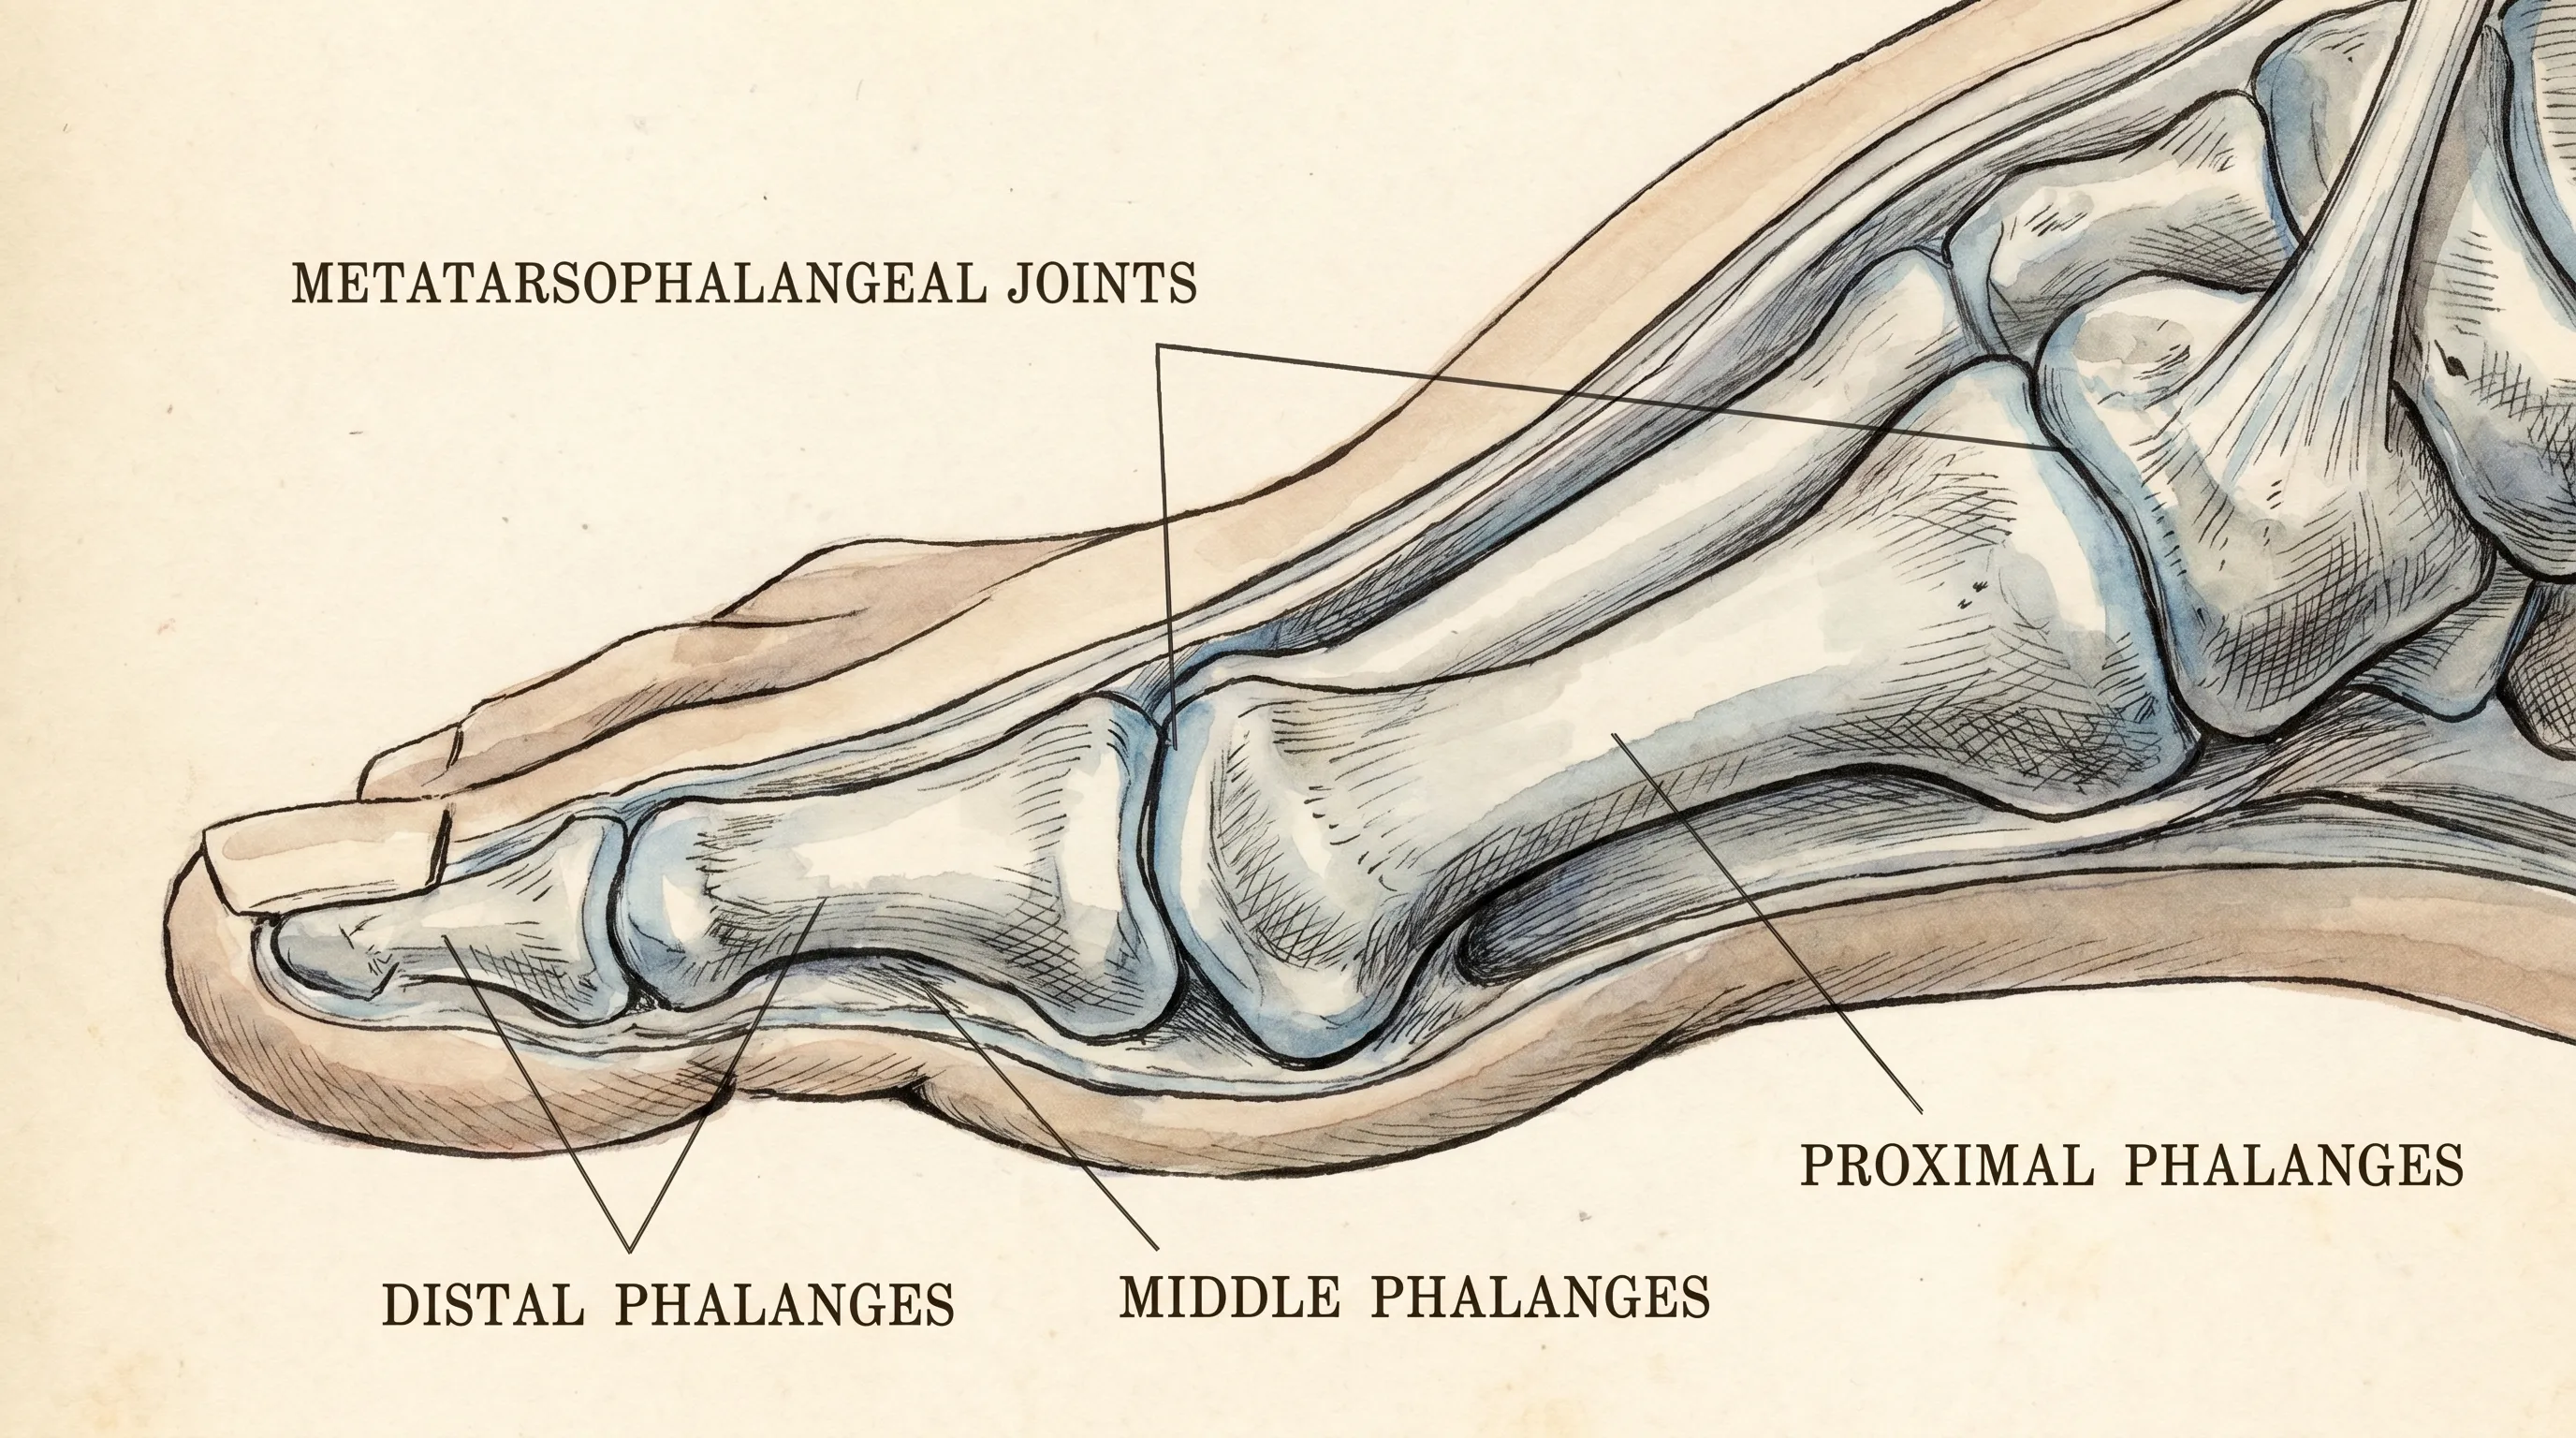
A jammed toe occurs when an external force strikes the tip of the digit, driving it backward toward the foot and abruptly compressing the joint space. This axial loading mechanism overloads the ligamentous structures and joint capsule, often resulting in micro-tears, inflammation, and fluid accumulation within the metatarsophalangeal or interphalangeal joints. While the injury rarely threatens permanent disability when managed correctly, ignoring proper recovery protocols can lead to chronic instability, reduced proprioception, and early-onset osteoarthritis in the affected joint.
Free calculatorSleep CalculatorCalculate sleep cyclesOpen the calculatorThe Anatomy of the Toe Joint
Each toe consists of three small bones called phalanges, except for the big toe which contains only two. These bones are connected by hinge-like joints that allow flexion and extension during walking, running, and balancing. Surrounding these joints are collateral ligaments that stabilize lateral movement, plantar ligaments that reinforce the underside, and a fibrous joint capsule that maintains synovial fluid integrity. When a sudden compressive force impacts the toe tip, the joint space momentarily narrows, pinching soft tissues between the phalanges and stretching or tearing the ligamentous fibers beyond their elastic limits. This mechanical disruption triggers an immediate inflammatory cascade, recruiting immune cells to repair damaged tissue while simultaneously causing pain receptors to fire rapidly. The rich vascular network in the toes means that even minor trauma produces noticeable swelling within minutes. Understanding this anatomical vulnerability helps explain why certain positions and activities increase susceptibility and why targeted stabilization strategies remain essential throughout the healing process. For more detailed anatomical insights, you can explore peer-reviewed resources at https://www.aaos.org.
Common Mechanisms of Injury
Sports activities represent the most frequent catalyst for this injury, particularly in high-impact environments like soccer, rugby, basketball, and martial arts. When an athlete plants their foot firmly while changing direction rapidly, the toes absorb sudden deceleration forces that can easily exceed the structural tolerance of the joint complex. Similarly, falling objects dropped directly onto the foot or accidental collisions with heavy furniture during daily activities generate identical compression patterns. Barefoot movement on uneven terrain significantly increases risk because unprotected toes lack the shock-absorbing benefits of cushioned footwear. Certain occupational environments also contribute to recurrent incidents; construction workers, warehouse staff, and athletes who repeatedly pivot on hard surfaces experience higher cumulative microtrauma that weakens ligament integrity over time. Environmental factors such as wet floors, cluttered hallways, and poorly maintained athletic courts compound these mechanical stressors, creating unpredictable impact vectors that the foot cannot safely dissipate. Recognizing these high-risk scenarios allows individuals to modify movement patterns, upgrade protective gear, and implement preventive conditioning programs that reinforce joint resilience before trauma occurs.
Recognizing the Symptoms of a Jammed Toe
Clinical presentation typically begins with immediate localized pain that intensifies during weight-bearing activities or direct palpation. The affected digit rapidly swells as synovial fluid leaks into surrounding tissue spaces, creating a visible puffiness that may extend to adjacent toes over twenty-four hours. Bruising frequently appears beneath the skin or around the nail bed, indicating minor capillary rupture. Range of motion becomes restricted due to mechanical swelling and protective muscle guarding, making it difficult to fully flex or extend the digit without discomfort. Some individuals report a grinding or popping sensation during initial movement, which often reflects transient joint capsule misalignment rather than structural separation. Pain usually follows a predictable trajectory: peaking within the first twelve to forty-eight hours, gradually subsiding as inflammation decreases, and resolving completely once soft tissue repair concludes. However, persistent throbbing pain that disrupts sleep, inability to bear weight after forty-eight hours, or visible angular deformity suggests a more severe condition that requires professional evaluation. Monitoring these clinical markers closely allows patients to distinguish between routine soft tissue trauma and injuries that demand imaging or specialized intervention. Comprehensive symptom tracking guides also help healthcare providers differentiate between mild sprains and complex fractures during clinical assessment.
Primary Warning Signs
The most reliable indicators include sharp pain localized to the interphalangeal or metatarsophalangeal joints, rapid swelling within two hours of impact, stiffness during morning movements, and mild discoloration that transitions from red to purple over several days. Tenderness upon light touch, particularly along the joint margins rather than the bone shaft, typically points toward ligamentous involvement. Patients often notice that pain worsens when pushing off during walking or climbing stairs, as these movements require substantial toe flexion and ground reaction force transmission. A subtle increase in skin temperature around the injured area reflects localized inflammatory activity, which naturally peaks during the first thirty-six hours. When these signs remain mild and progressively improve with conservative management, the prognosis remains excellent. Conversely, worsening symptoms after seventy-two hours, numbness extending to the toe tip, or an inability to wiggle the digit voluntarily warrant immediate clinical consultation to rule out nerve compromise or severe structural damage.
Jammed Toe vs. Sprained vs. Fractured: Key Differences
Accurate differentiation between these conditions determines treatment urgency and long-term outcomes. While terminology often overlaps in casual conversation, medical professionals distinguish them based on tissue involvement and structural integrity. A jammed toe primarily describes the mechanism of injury (axial compression), which may result in either a sprain or minor fracture depending on force magnitude and joint angle at impact. A sprained toe specifically indicates ligament stretching or tearing without bone disruption, whereas a fracture involves actual phalangeal cracking or displacement. Clinical differentiation relies on symptom severity, functional testing, and diagnostic imaging. The table below outlines distinguishing characteristics to help patients make informed initial decisions.
| Feature | Jammed Toe (Mild Soft Tissue) | Sprained Toe | Fractured Toe |
|---|---|---|---|
| Pain Onset | Immediate, moderate | Immediate, moderate to severe | Sudden, intense, often sharp |
| Swelling Timeline | Develops over 1-2 hours | Peaks at 12-24 hours | Rapid, maximal within 1 hour |
| Bruising Pattern | Mild, around joint only | Noticeable, spreads slightly | Extensive, often under nail |
| Weight Bearing | Possible with discomfort | Difficult but possible | Often impossible or severely limited |
| Deformity | None visible | Minimal or none | Visible misalignment possible |
| Diagnostic Need | Clinical exam usually sufficient | Clinical exam + stress test | X-ray mandatory for confirmation |
For evidence-based diagnostic guidelines, refer to clinical resources at https://www.mayoclinic.org.
Immediate First Aid and Home Management
Prompt intervention during the first forty-eight hours significantly influences recovery speed and tissue healing quality. The body's natural inflammatory response requires careful modulation; complete suppression impedes cellular repair, while uncontrolled inflammation causes prolonged stiffness and delayed rehabilitation. Following established orthopedic protocols ensures optimal biological conditions for ligament regeneration and joint stabilization.
The RICE Protocol Explained
The RICE method remains the gold standard for acute foot trauma management. Rest involves minimizing weight-bearing activities, avoiding prolonged standing, and eliminating high-impact exercises until pain-free movement returns. Ice application should occur for fifteen to twenty minutes every two to three hours during the first two days, using a thin cloth barrier to prevent frostbite and alternating with brief elevation periods. Compression utilizes a light elastic bandage wrapped distal to proximal, ensuring adequate circulation by checking for capillary refill and avoiding numbness. Elevation requires positioning the foot above cardiac level on stacked pillows, ideally while lying down, to leverage gravity for fluid drainage and reduced vascular pressure. Adhering strictly to this protocol reduces secondary tissue damage, limits hematoma formation, and accelerates the transition to the proliferative healing phase. Recent clinical updates also emphasize protected mobilization over complete immobilization after the first forty-eight hours to maintain joint nutrition and prevent stiffness. Detailed implementation guides are available at https://www.clevelandclinic.org.
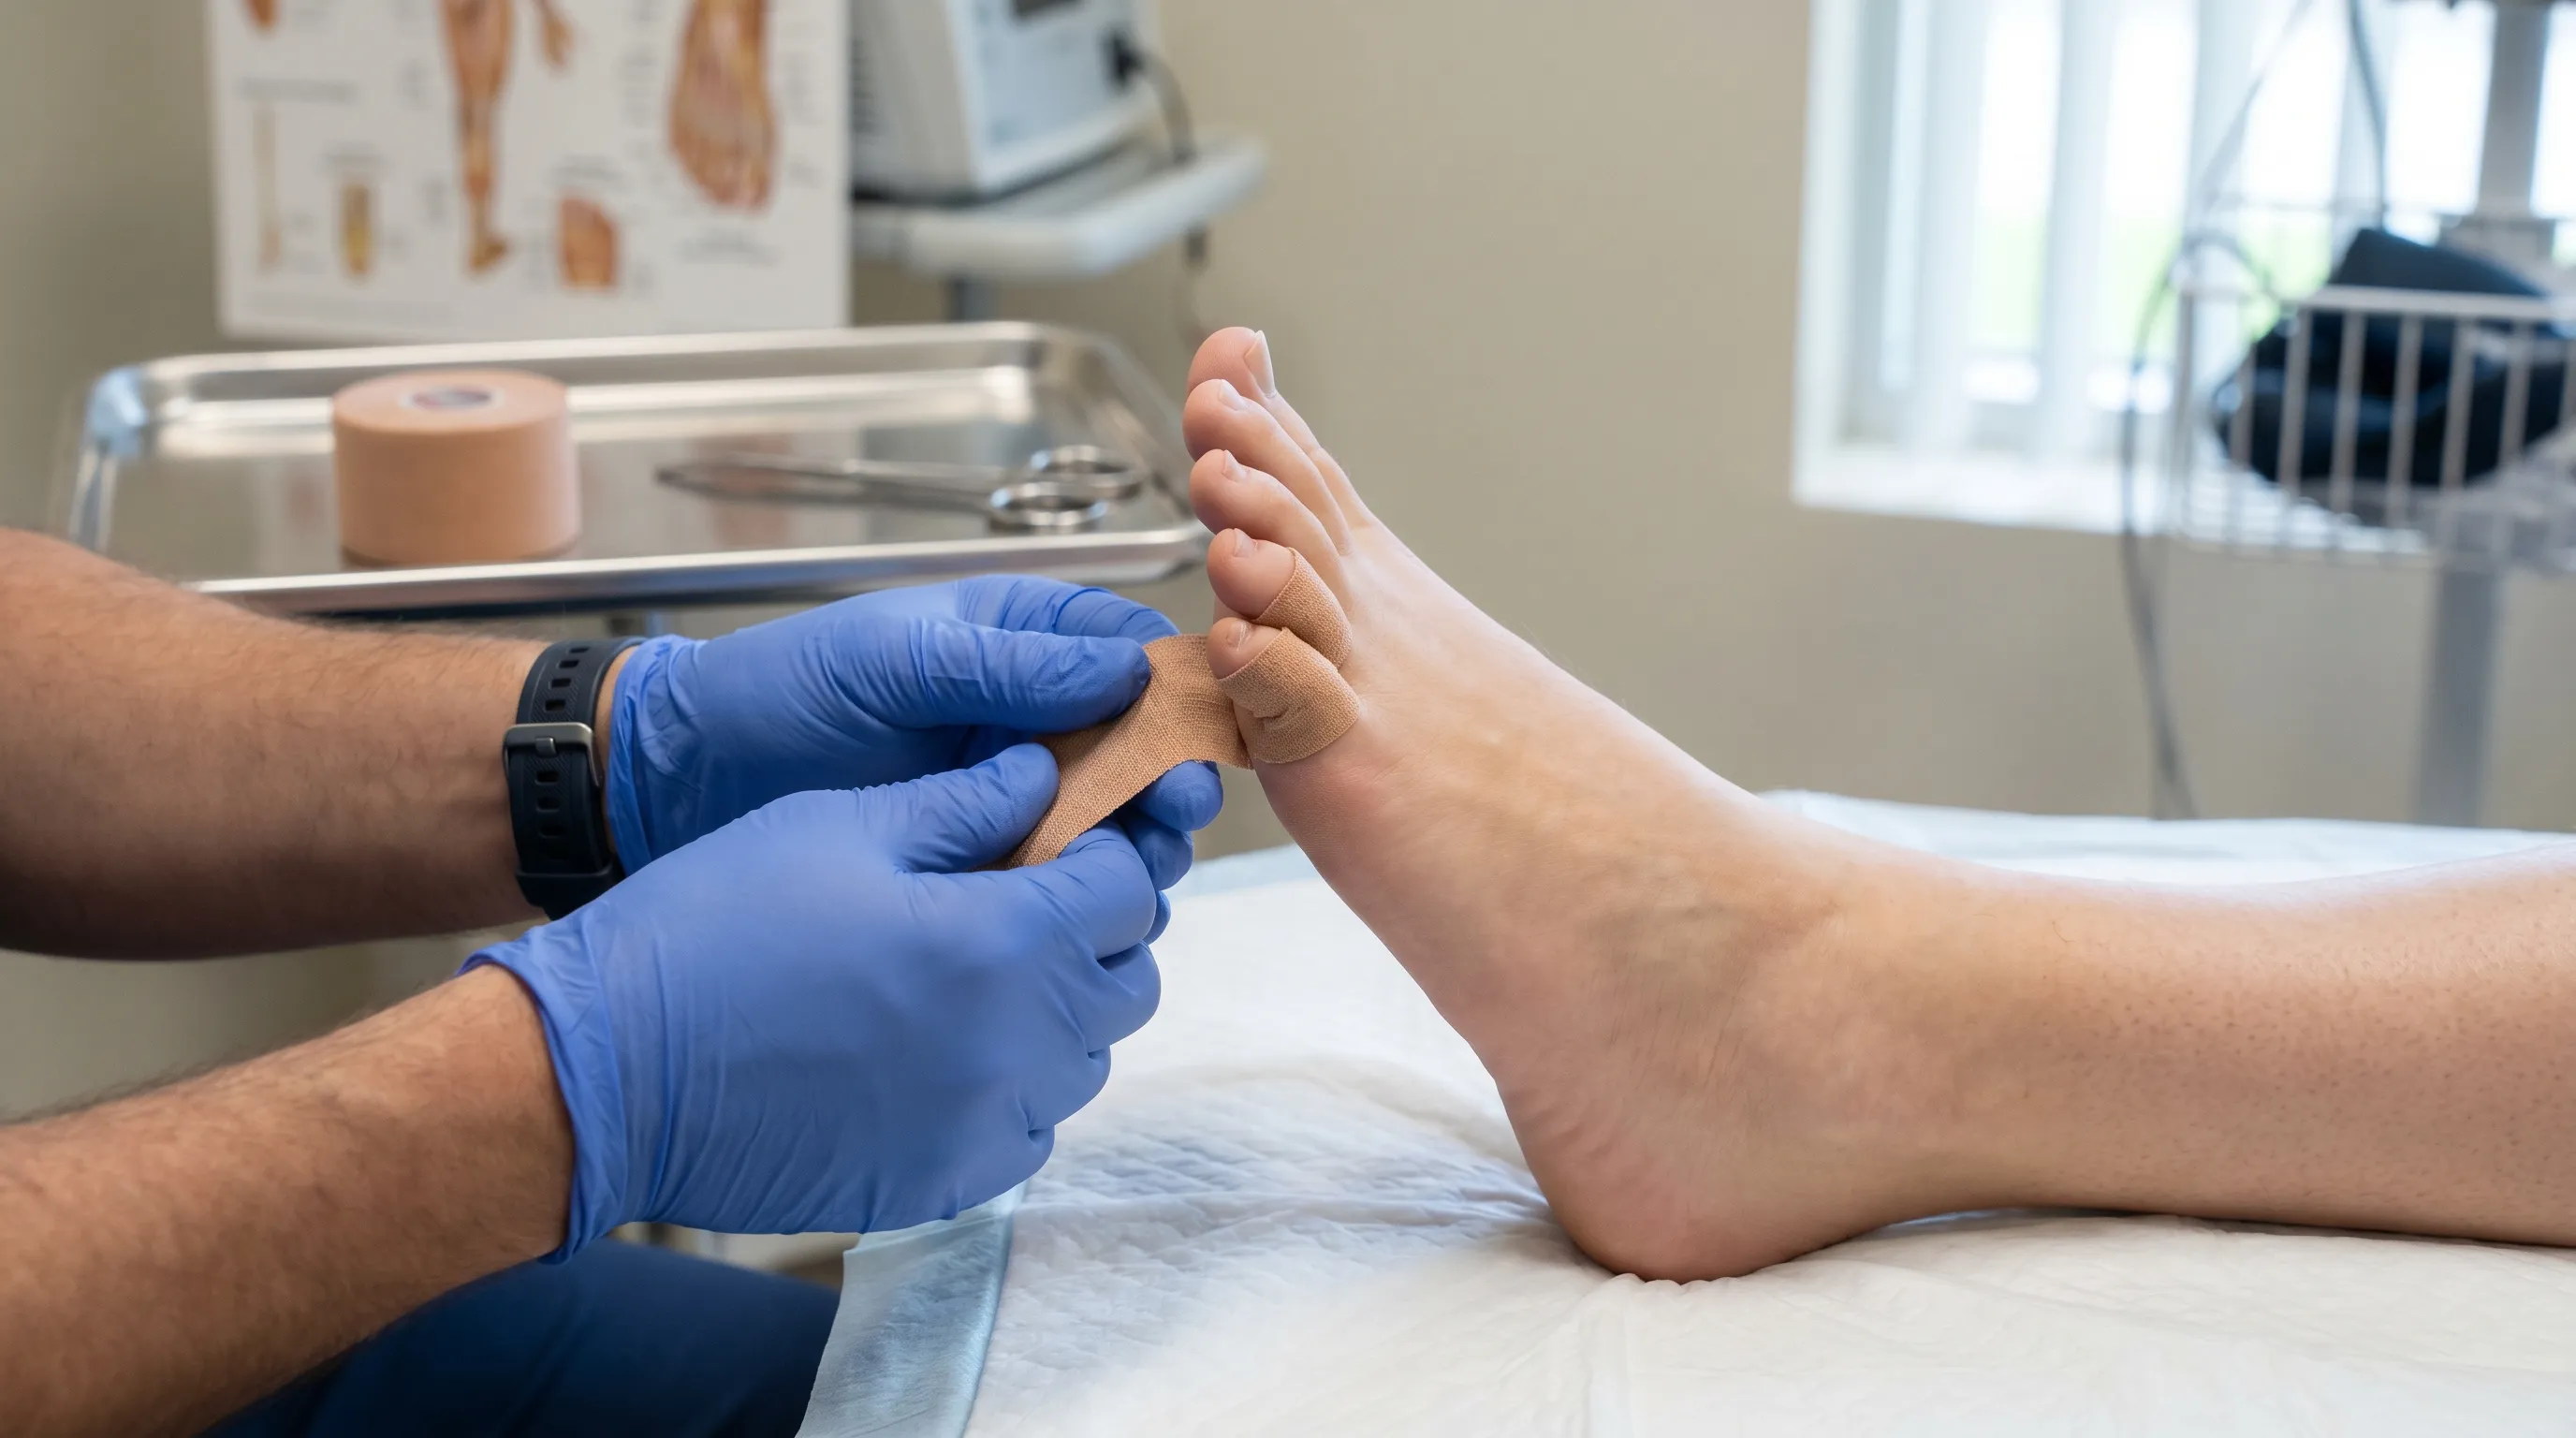
Proper Taping Techniques (Buddy Taping)
Buddy taping provides mechanical stability by securing the injured digit to an adjacent healthy toe, allowing natural movement while preventing harmful lateral deviation or excessive flexion. Begin by cleaning and drying both toes thoroughly to ensure adhesive integrity. Place a thin cotton pad or foam spacer between them to absorb moisture and prevent maceration. Using one-half inch rigid athletic tape or medical-grade cohesive wrap, secure the base of both toes together with gentle tension, avoiding circumferential constriction that compromises blood flow. Apply two additional strips over the middle and tip segments, maintaining neutral alignment. The taping should feel supportive rather than restrictive; you must still wiggle both digits slightly and experience no color changes or tingling. Replace the tape every two to three days or when it becomes wet or loose. This technique distributes ground reaction forces across multiple digits, reduces joint capsule strain, and promotes confidence during early weight-bearing activities. Always monitor skin integrity and discontinue use if irritation, blistering, or circulation impairment develops.
Medical Evaluation and Treatment Options
While most minor injuries resolve with conservative care, specific clinical indicators require professional assessment to prevent permanent joint dysfunction. Healthcare providers utilize systematic physical examinations, functional stress tests, and advanced imaging modalities to determine injury severity and design individualized treatment pathways.
When to Seek Professional Care
Consult a physician or podiatrist immediately if you experience severe unrelenting pain that does not respond to over-the-counter analgesics, visible toe misalignment or rotational deformity, open wounds or nail bed lacerations, inability to bear weight after forty-eight hours, or signs of infection including spreading redness, warmth, pus, or fever. Individuals with peripheral neuropathy, diabetes, or vascular disease require prompt evaluation for even minor foot trauma due to compromised healing capacity and elevated ulceration risk. Delayed treatment in these populations can lead to chronic nonunion, osteomyelitis, or permanent gait abnormalities. Early clinical intervention ensures appropriate immobilization, pain management, and targeted rehabilitation referrals that preserve long-term foot biomechanics.
Diagnostic Imaging and Clinical Tests
Medical evaluation begins with palpation to identify exact tenderness locations, followed by range-of-motion assessments that measure flexion, extension, and lateral deviation capacity. Providers perform varus and valgus stress tests to evaluate ligamentous laxity and compare findings against the unaffected foot. If structural disruption is suspected, plain radiography (X-ray) in anteroposterior, lateral, and oblique views confirms or rules out phalangeal fractures, joint subluxation, or avulsion injuries. Magnetic resonance imaging or ultrasound may be ordered when soft tissue detail is essential, such as assessing plantar plate tears or severe tendon involvement. Clinical findings combined with imaging results establish precise diagnostic classifications that guide subsequent treatment intensity and expected recovery timelines.
Prescription and Advanced Therapies
Moderate to severe injuries often require additional interventions beyond home care. Nonsteroidal anti-inflammatory medications prescribed in appropriate dosages help manage pain while reducing excessive swelling during the acute phase. Some clinicians recommend short-term immobilization using a postoperative shoe, walking boot, or custom splint to protect the joint complex during early tissue remodeling. Physical therapy referrals introduce manual therapy, modalities like therapeutic ultrasound or electrical stimulation, and progressive loading programs that restore proprioception and dynamic stability. In rare cases involving severe ligament detachment, intra-articular damage, or displaced fractures requiring reduction, surgical consultation becomes necessary to realign bone fragments or repair ruptured stabilizing structures. All advanced treatments emphasize functional restoration over complete structural perfection, prioritizing safe weight-bearing patterns and gradual activity progression.
Rehabilitation and Long-Term Recovery
Once acute inflammation subsides, structured rehabilitation becomes the primary driver of functional restoration. Neglecting this phase frequently results in chronic stiffness, altered gait mechanics, and increased susceptibility to future injuries. Evidence-based exercise protocols gradually reintroduce load, restore joint arthrokinematics, and rebuild neuromuscular coordination without overwhelming healing tissues.
Gentle Stretching and Mobility Exercises
Begin mobility work only when resting pain remains below three out of ten and acute swelling has significantly decreased. Start with passive range-of-motion movements: gently grasp the injured toe and guide it through full flexion and extension for two to three sets of fifteen repetitions daily, ensuring no sharp pain occurs. Progress to active toe spreads by placing a small towel under your foot and attempting to lift the digit off the surface while keeping the heel grounded, holding for three seconds before releasing. Towel scrunches strengthen intrinsic foot muscles that stabilize the arch and improve load distribution; place a lightweight cloth on the floor and use your toes to pull it toward you repeatedly. Marble pickups using glass beads or cotton balls further enhance fine motor control and joint lubrication. Perform these exercises twice daily on non-consecutive days initially, then transition to daily routines as tolerance improves. Watch this guided demonstration:
Strengthening for Injury Prevention
After four to six weeks of consistent mobility training, introduce controlled resistance work to rebuild ligamentous tensile strength and muscular endurance. Use a light resistance band wrapped around the forefoot, anchoring the opposite end to a sturdy post. Perform resisted toe flexion by pulling your foot backward against the band while keeping the ankle stationary, completing three sets of twelve controlled repetitions. Progress to balance board or foam pad training, which challenges proprioceptive feedback and forces the small stabilizing muscles of the foot to activate continuously during micro-adjustments. Calf raises on flat ground transition to single-leg variations as stability improves, reinforcing kinetic chain integration from the ankle upward. Incorporate barefoot walking on safe indoor surfaces gradually to stimulate mechanoreceptors in the plantar fascia and restore natural shock absorption patterns. Always prioritize quality of movement over volume, stopping immediately if joint pain exceeds mild discomfort levels. For comprehensive strengthening protocols, explore resources at https://www.healthline.com.
Preventive Strategies and Footwear Guidelines
Long-term foot health depends on proactive measures that minimize mechanical stress and optimize environmental safety. Implementing consistent preventive habits dramatically reduces recurrence rates and preserves joint mobility across all age groups.
Choosing the Right Athletic Shoes
Footwear selection represents the most impactful modifiable risk factor for toe protection. Select shoes with a wide toe box that allows natural digit splay without lateral compression, ensuring adequate vertical height to prevent dorsal rubbing during impact phases. Look for models featuring reinforced toe bumpers made from durable rubber or thermoplastic materials that deflect blunt trauma effectively. Midsole cushioning should balance shock absorption with stability; excessive softness encourages instability, while overly rigid designs restrict natural foot articulation. Replace athletic footwear every three hundred to five hundred miles or when outsole wear becomes asymmetrical, as degraded midsoles lose protective capacity long before visible exterior deterioration appears. Avoid training in worn-out shoes or transitioning directly from cushioned daily wear to minimalist designs without gradual adaptation periods. Consult specialty running stores for gait analysis and individualized recommendations that align with your foot morphology and activity demands.
Environmental and Activity Modifications
Modify training environments and movement patterns to reduce unpredictable impact vectors. Maintain clear walkways at home, secure loose rugs, and use non-slip mats in wet areas like bathrooms and kitchens. During sports participation, ensure proper warm-up routines that include dynamic ankle mobility, calf activation, and light foot articulation drills before high-intensity activity begins. Gradually increase training volume and intensity following the ten percent rule, allowing connective tissues time to adapt to cumulative loads. Avoid sudden transitions to hard training surfaces when previously accustomed to softer terrains. Implement cross-training schedules that distribute stress across different muscle groups and movement planes, preventing localized overuse and fatigue-induced technique breakdown. Regularly inspect footwear for internal debris, seam degradation, or moisture retention that could compromise joint protection during active use. Consistent environmental awareness combined with mindful movement habits creates a resilient foundation that minimizes acute trauma and supports lifelong foot functionality.
Watch this expert breakdown on injury prevention mechanics:
Frequently Asked Questions
How long does it take for a jammed toe to heal?
Most mild jammed toe injuries heal within two to four weeks with proper rest, ice, and elevation. Moderate sprains may require four to six weeks for complete ligament recovery. Severe cases involving fractures or significant joint capsule damage can take eight to twelve weeks. Healing timelines depend heavily on injury severity, age, circulation, and adherence to rehabilitation protocols.
Can you walk with a jammed toe?
You can often walk with a jammed toe, though it may be uncomfortable initially. It is generally safe to bear weight if the pain is manageable and there is no severe deformity or instability. Using a stiff-soled shoe, applying buddy tape, or utilizing crutches temporarily can reduce stress on the injured joint while allowing safe mobility during the early recovery phase.
Should you soak a jammed toe in hot water or Epsom salts?
During the first forty-eight to seventy-two hours after injury, soaking in warm water is not recommended as heat can increase inflammation and swelling. Cold therapy is the priority initially. After the acute inflammatory phase subsides, soaking in warm water with Epsom salts may help relax surrounding muscles and improve circulation, but always follow your healthcare provider's specific guidance.
What is the difference between a jammed toe and a broken toe?
A jammed toe typically involves ligament sprains, joint capsule compression, or mild soft tissue trauma without bone disruption. A broken toe involves a fracture in the phalanx bone. While symptoms overlap, a fracture often presents with immediate severe swelling, bruising under the nail, visible misalignment, or a snapping sensation during injury. Only medical imaging can definitively differentiate between the two.
How should you sleep with a jammed toe?
Sleep with your foot elevated on one or two pillows above heart level to minimize overnight fluid accumulation and throbbing pain. Keep the injured toe protected with light gauze padding and maintain loose bedding to prevent accidental pressure or bending. Avoid sleeping with tight socks that restrict circulation, and consider using a soft toe spacer if prescribed by a physical therapist.
Conclusion
Recovering from a jammed toe requires patience, accurate injury assessment, and consistent adherence to evidence-based rehabilitation protocols. While the initial pain and swelling can feel alarming, understanding the underlying anatomical mechanisms empowers you to implement appropriate first aid strategies that protect vulnerable joint structures and accelerate tissue repair. Distinguishing between minor soft tissue trauma and conditions requiring medical imaging prevents unnecessary complications and ensures timely professional intervention when warranted. By integrating the RICE method correctly, applying buddy tape safely, and progressing through structured mobility and strengthening exercises, most individuals achieve full functional restoration within several weeks. Long-term foot health ultimately depends on proactive prevention measures, including proper footwear selection, environmental hazard management, and gradual training progression that respects biological healing timelines. Treating every minor foot trauma with clinical respect not only resolves current discomfort but also builds resilient movement patterns that support an active lifestyle for years to come. Prioritize early intervention, listen to your body's feedback signals, and consult qualified healthcare providers whenever recovery stalls or symptoms worsen beyond expected parameters.
How we work
Researched and drafted with AI assistance, then reviewed by a human editor against the cited sources.
This article is general health information, not medical advice. Consult a qualified healthcare professional about your own situation.