How to Safely Remove a Tick with Tweezers

Key points
- Deer Tick (Blacklegged Tick): Known for transmitting Lyme disease, anaplasmosis, and babesiosis. Nymphal blacklegged ticks are particularly problematic because they are the size of a poppy seed, making their bites easy to miss during the critical early stages.
- American Dog Tick: Can transmit Rocky Mountain spotted fever and tularemia. Despite the name, they readily bite humans and thrive in grassy areas along trails and roadsides.
- Lone Star Tick: Can transmit Ehrlichiosis and is associated with alpha-gal syndrome, a red meat allergy. This species is easily identified by a distinct white spot on the back of the female tick and has an expanding range across the eastern and southeastern United States.
Introduction
Summertime and outdoor adventures often mean hiking, picnicking, and enjoying nature. But along with the fresh air comes a tiny but potentially dangerous hitchhiker: the tick. These small, blood-sucking arachnids can attach to your skin and transmit serious illnesses like Lyme disease and Rocky Mountain spotted fever. According to the Centers for Disease Control and Prevention, reported cases of tick-borne diseases in the United States have more than doubled over the past two decades, largely due to climate changes, expanding wildlife habitats, and increased human outdoor activity. Finding a tick on your body can be alarming, but the key is prompt and proper removal. The best tool for the job is a simple pair of tick removal tweezers. Using the right technique can mean the difference between a safe removal and a lingering health problem. This guide will walk you through everything you need to know to handle tick encounters with confidence.
 attached to human skin. Prompt removal with fine-tipped tweezers is crucial to prevent disease transmission.")
Whether you are an avid camper, a weekend gardener, or simply someone who enjoys evening walks in local parks, understanding tick biology and removal protocols is a fundamental aspect of modern outdoor safety. By equipping yourself with the right knowledge and tools, you can mitigate risks and ensure that your time in nature remains a healthy, enjoyable experience rather than a source of medical anxiety.
What Are Ticks?
Ticks are tiny parasitic arachnids, related to spiders and mites, that feed on the blood of humans and animals. They are commonly found in grassy, bushy, or wooded areas. Ticks don’t fly or jump; instead, they wait on blades of grass or leaves and latch onto a host that brushes by. This behavior is known as "questing." Ticks hold on to leaves or grass by their third and fourth pairs of legs, extending their first pair of legs outward to latch onto a passing host. They detect potential hosts through a specialized sensory organ called Haller's organ, located on their front legs, which is highly sensitive to carbon dioxide, heat, moisture, and body odors.
Common types of ticks in the United States include:
- Deer Tick (Blacklegged Tick): Known for transmitting Lyme disease, anaplasmosis, and babesiosis. Nymphal blacklegged ticks are particularly problematic because they are the size of a poppy seed, making their bites easy to miss during the critical early stages.
- American Dog Tick: Can transmit Rocky Mountain spotted fever and tularemia. Despite the name, they readily bite humans and thrive in grassy areas along trails and roadsides.
- Lone Star Tick: Can transmit Ehrlichiosis and is associated with alpha-gal syndrome, a red meat allergy. This species is easily identified by a distinct white spot on the back of the female tick and has an expanding range across the eastern and southeastern United States.
When ticks bite, they can pass pathogens into your bloodstream. However, the good news is that prompt and proper tick removal can greatly reduce the risk of disease transmission. Most tick-borne bacteria, including the one that causes Lyme disease, require the tick to be attached for 24-48 hours before transmission occurs. Ticks go through four life stages: egg, larva, nymph, and adult. Each stage requires a blood meal to progress. Because larval and nymphal ticks are exceptionally small, often mistaken for dirt or freckles, routine skin checks are vital. Understanding that ticks can remain attached for days while slowly feeding underscores why vigilance and immediate intervention are medical priorities.
Why Quick Tick Removal Matters
Time is of the essence when it comes to removing a tick. The longer a tick remains attached, the greater the chance it can pass on harmful pathogens.
Key reasons why quick removal is important:
- Reduce Risk of Disease: Most pathogens need time to travel from the tick into your bloodstream. When a tick first attaches, it is typically not infected in its salivary glands. As it feeds, pathogens migrate from its midgut to its salivary glands, a process that usually takes at least 24 hours for Borrelia burgdorferi (Lyme disease) but can be significantly shorter for other agents like Powassan virus or Francisella tularensis. Quick removal can stop this process before it starts.
- Prevent Local Infection: A tick bite can cause skin irritation. Removing the tick and cleaning the area helps prevent a secondary infection. Furthermore, prolonged attachment can lead to localized granulomas or delayed hypersensitivity reactions that mimic more serious infections, complicating clinical diagnoses.
- Ease of Removal: Ticks anchor themselves more firmly over time. They secrete a cement-like substance to secure their mouthparts to the host's tissue. They are often easier to remove intact shortly after they attach. Delaying removal allows this cement to harden and makes mechanical extraction more difficult and traumatic to the skin.
In clinical settings, studies consistently show that removing a tick within the first 36 hours of attachment reduces the probability of contracting Lyme disease to nearly zero. This statistical reality reinforces the importance of performing thorough tick checks every few hours during outdoor excursions and immediately upon returning indoors. Early intervention is your most effective defense against systemic illness.
What Are Tick Removal Tweezers?
Tick removal tweezers are specially designed fine-tipped tweezers made to safely and effectively remove ticks. Unlike regular household tweezers with blunt tips, their pointy, narrow design allows you to grasp the tick as close to the skin’s surface as possible, which is critical for removing the entire tick, including its mouthparts.
Grabbing a tick by its swollen body can squeeze infectious fluids into your bloodstream. Fine-tipped tweezers minimize this risk by targeting the tick's head. While specialized tools like tick hooks or keys exist, fine-tipped tweezers remain the go-to method recommended by the Centers for Disease Control and Prevention (CDC) and other health professionals. High-quality tick removal tweezers are typically crafted from surgical-grade stainless steel or titanium, which resists corrosion, maintains a sharp grip over time, and can be easily sterilized. Many feature a slightly serrated or crosshatched tip to prevent slipping during extraction, which is particularly useful when dealing with engorged ticks that have become slick with blood.
When selecting a pair, look for a design with a comfortable, ergonomic grip and tips that align perfectly when closed. Misaligned tips can crush the tick rather than grip it securely. It is advisable to store a dedicated pair in your travel first-aid kit, glove compartment, and home medicine cabinet, ensuring they are always accessible during outdoor activities. Proper maintenance, including wiping them down with isopropyl alcohol after each use and storing them in a dry case, prevents bacterial contamination and ensures they are ready for immediate deployment when needed.
How to Use Tick Removal Tweezers: A Step-by-Step Guide
Removing a tick is straightforward, but the correct technique is crucial. Follow these steps for safe removal:
1. Stay Calm and Prepare Take a deep breath. Gather your supplies: fine-tipped tweezers, antiseptic wipes or rubbing alcohol, and soap and water. If you have them, wear disposable gloves. Find a well-lit area or use a headlamp if you are outdoors at dusk or in dense canopy cover. Good lighting is essential for visualizing the exact point of attachment, especially if the tick is a tiny nymph. Having a magnifying glass or a smartphone with a macro camera zoom can be highly beneficial for accurate placement.
2. Grasp the Tick Close to the Skin Use the fine-tipped tweezers to grasp the tick's head or mouthparts as close to the skin as you can. Avoid grabbing its swollen body. Part hair or clothing gently to expose the bite site. Position the tweezers horizontally, parallel to the skin's surface, to ensure the tips slide underneath the tick's capitulum (mouthparts) rather than pinching the body. A firm but controlled grip is necessary to prevent the tick from regurgitating or tearing during extraction.
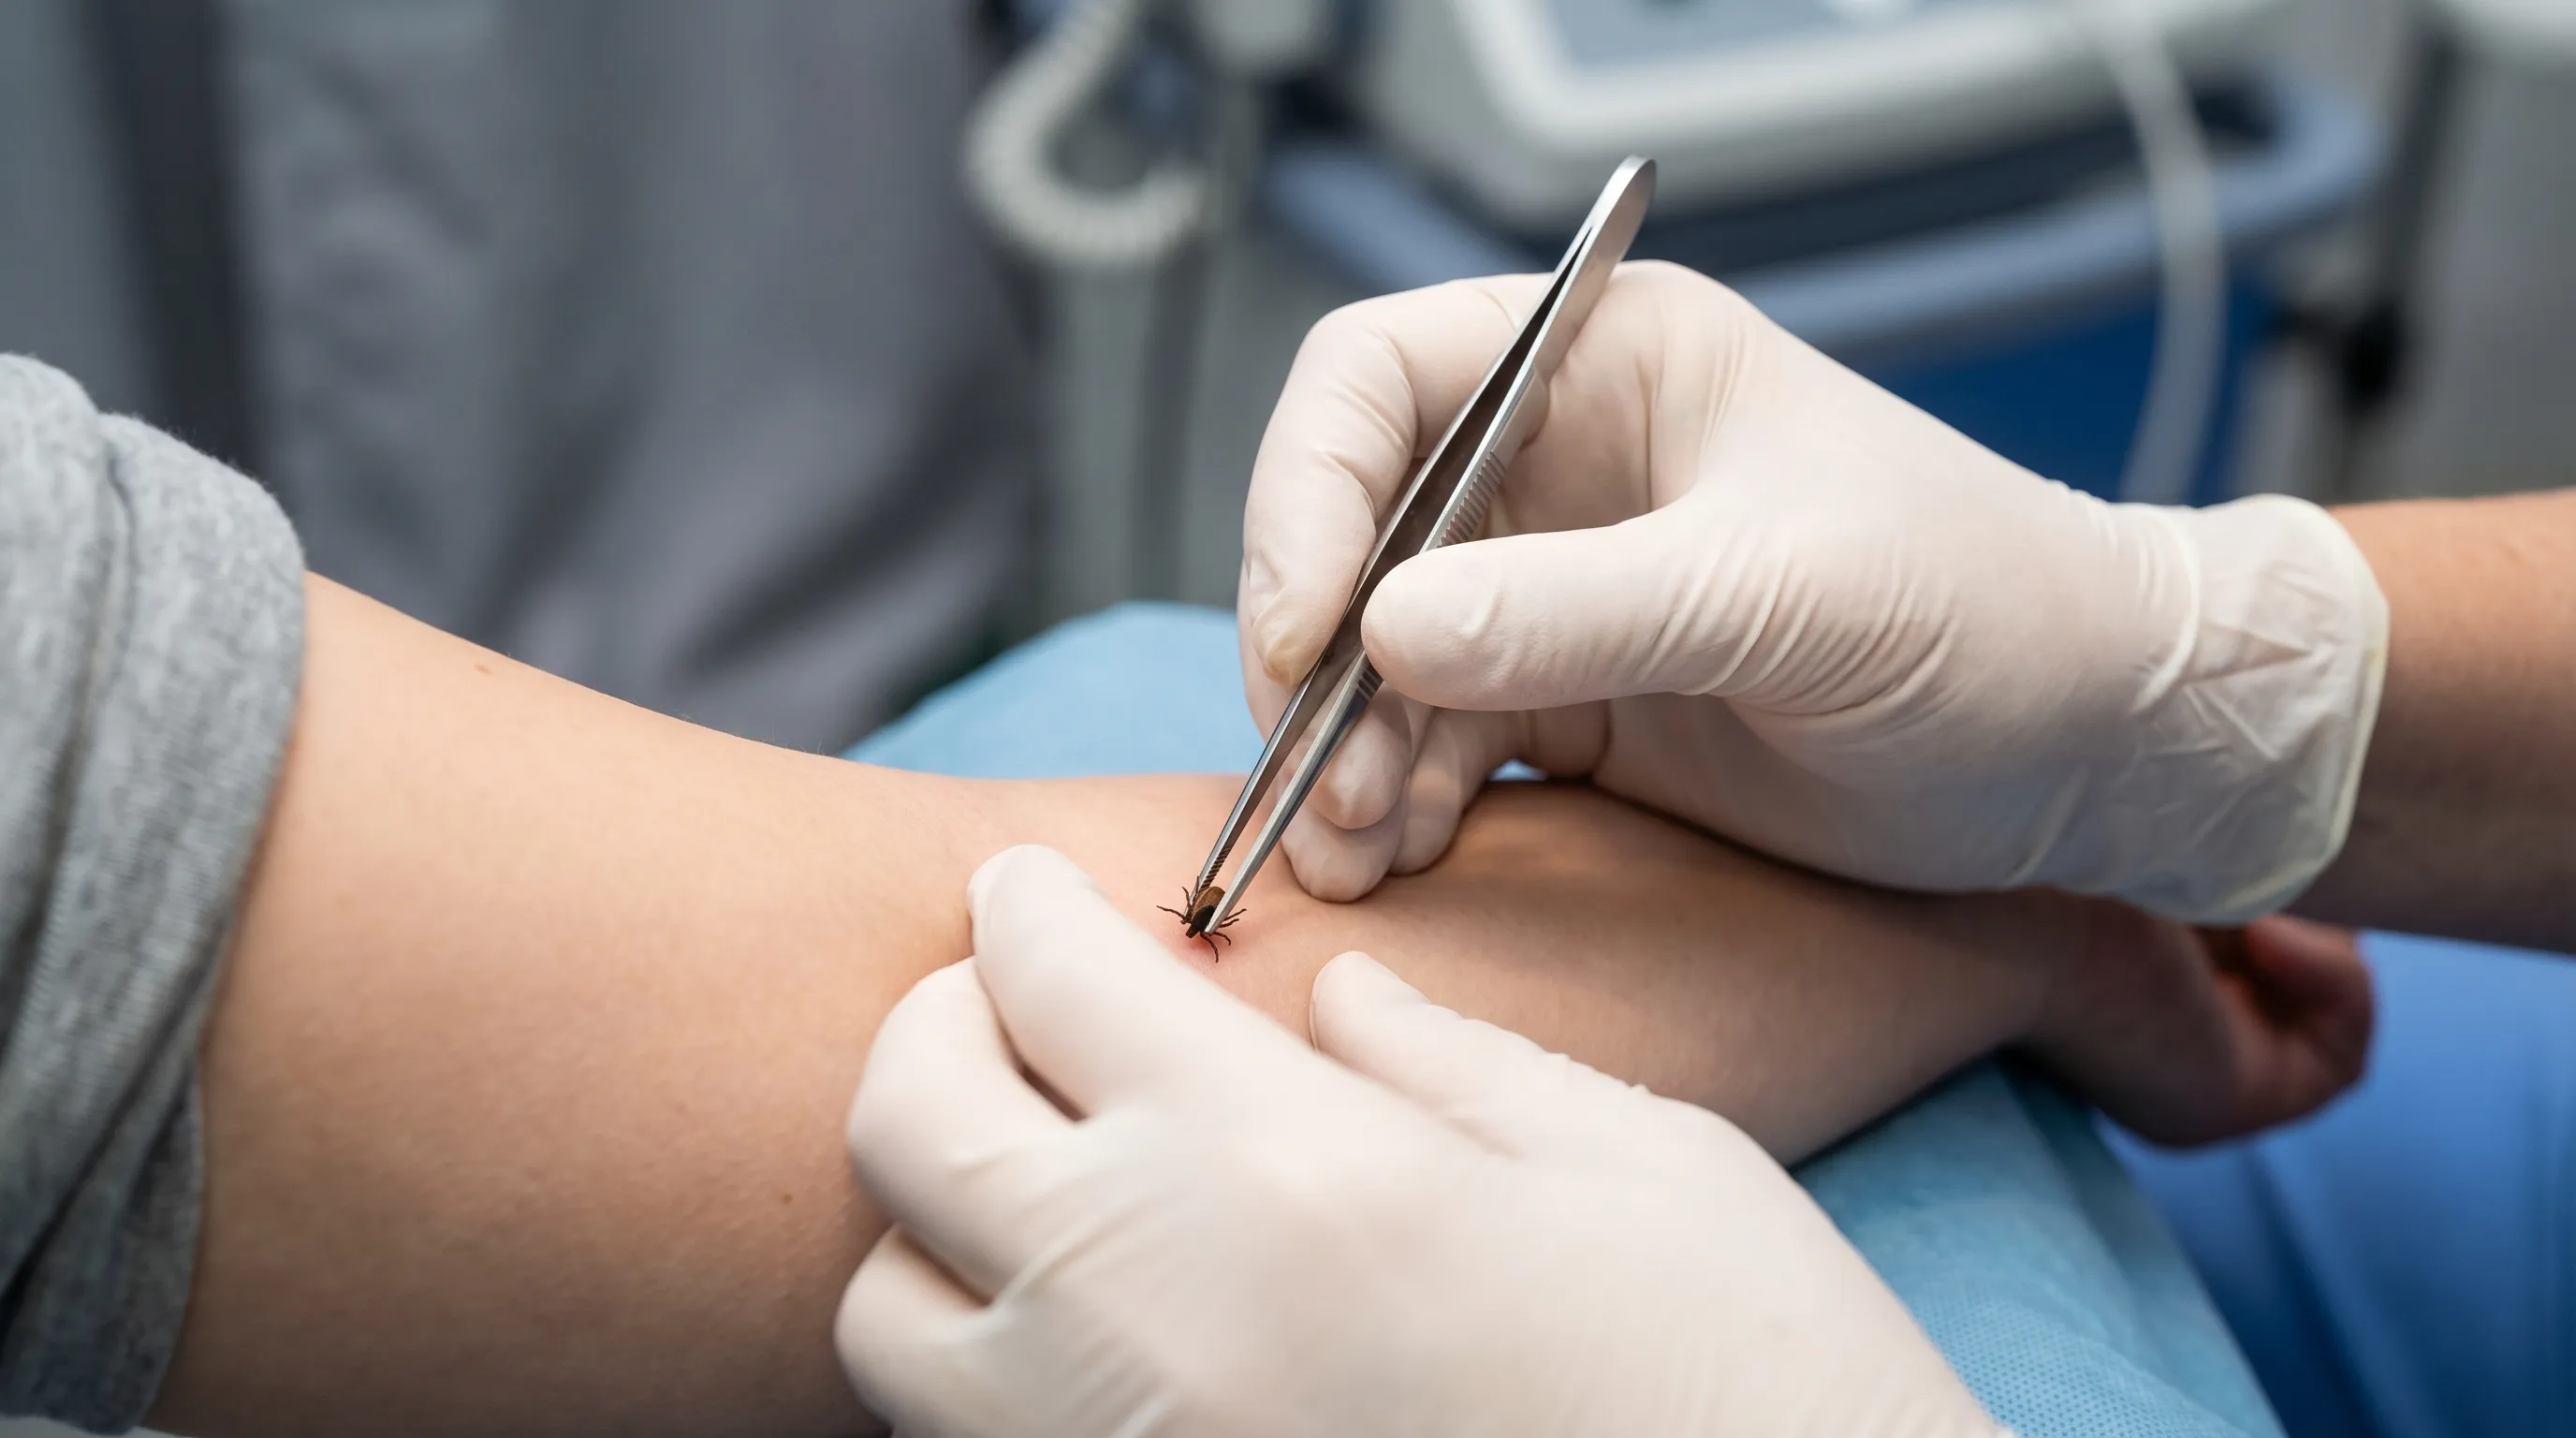
3. Pull Upward Steadily and Gently Pull upward with steady, even pressure. Do not twist, jerk, or yank the tick, as this can cause its mouthparts to break off and remain in your skin. Be patient; it may take a few seconds of consistent pressure for the tick to release. Think of this motion like slowly removing an adhesive bandage. Sudden movements increase intra-tick pressure, forcing salivary contents into the wound. If the tick does not release immediately, pause for a moment, ensure your grip is optimal, and continue the steady upward pull.
4. Handle Remaining Mouthparts (If Necessary) If the tick's head or mouthparts break off, don't panic. Try to gently remove the remaining parts with the clean tweezers. If you can't remove them easily, leave them alone. The skin will typically heal and push the fragments out on its own, like a splinter. Do not dig aggressively at your skin. Aggressive digging increases the risk of introducing secondary bacteria from under your nails or the environment, potentially causing cellulitis. If embedded parts cause persistent irritation or you suspect a large fragment remains, consult a dermatologist or primary care provider for sterile extraction.
5. Clean the Bite Area and Your Hands After the tick is removed, thoroughly clean the bite area and your hands with rubbing alcohol, an iodine scrub, or soap and water. You can apply an antibiotic ointment to the bite site to help prevent infection. Avoid using harsh chemicals directly in the open wound, as they can delay tissue healing. Once cleaned, leave the bite uncovered to allow it to breathe, or cover it with a sterile bandage if it is located in an area prone to friction from clothing.
6. Dispose of the Tick Dispose of the live tick by submerging it in rubbing alcohol, placing it in a sealed bag, wrapping it tightly in tape, or flushing it down the toilet. Never crush a tick with your fingers. Crushing can expose you to tick hemolymph or pathogens through microscopic cuts on your skin. If you wish to have the tick identified or tested, place it alive in a small, sealable container with a moist cotton ball or paper towel, and refrigerate it until it can be delivered to a testing facility or healthcare provider.
7. Monitor Your Health Over the next 30 days, watch for signs of illness, such as:
- A rash, especially a "bull's-eye" rash (erythema migrans)
- Fever or chills
- Headache, fatigue, or muscle aches
If you develop any of these symptoms, contact a healthcare professional and inform them that you were recently bitten by a tick. Keep a log of the bite location, date, estimated duration of attachment, and any emerging symptoms. Early medical consultation can lead to timely diagnostic testing and, if warranted, prophylactic antibiotic treatment, which is highly effective when initiated within 72 hours of removal.
Video: Tick Removal Demonstration
To see the proper technique in action, watch this short, informative video from the CDC.
Why Use Tweezers Instead of Other Methods?
You may have heard of other "folk remedies" for tick removal, but they are not recommended and can be dangerous.
- Fingers vs. Tweezers: Squeezing a tick with your fingers can push infectious fluids into your body. Fine-tipped tweezers provide a precise grip on the head, which is much safer. Manual pinching also fails to provide the necessary mechanical advantage to overcome the tick's salivary cement, increasing the likelihood of leaving mouthparts embedded.
- Why Not Use Heat or Chemicals: Methods like burning the tick with a match, or smothering it with petroleum jelly or nail polish, are strongly discouraged. These methods can agitate the tick, causing it to regurgitate its stomach contents into the bite and increasing your risk of disease. Ticks are resilient organisms; attempting to suffocate them with ointments or oils is largely ineffective because they can close their spiracles (breathing pores) for extended periods. Instead of detaching calmly, they become stressed and actively pump saliva and gut contents into the host, drastically elevating the viral and bacterial load introduced into your system.
Expert Advice: According to the CDC, "Avoid folklore remedies such as 'painting' the tick with nail polish or petroleum jelly, or using heat to make the tick detach from the skin. Your goal is to remove the tick as quickly as possible—not waiting for it to detach."
Medical literature consistently supports mechanical extraction as the gold standard because it prioritizes speed, control, and minimal tissue trauma. While some commercial tick-removal tools utilize a sliding or rotating mechanism, they carry a higher risk of mouthpart detachment if not angled perfectly. Tweezers offer universal versatility across all tick species and life stages, making them the most reliable first-line tool for both laypersons and healthcare professionals.
Preventing Tick Bites in the First Place
While knowing how to remove ticks is essential, avoiding bites is even better.
- Use Insect Repellent: Apply an EPA-registered insect repellent containing DEET (20-30% concentration), picaridin (20%), IR3535, or oil of lemon eucalyptus on exposed skin. Reapply according to product instructions, especially after swimming or excessive sweating. Remember that DEET effectiveness plateaus around 30-50%, and higher concentrations only extend duration, not potency.
- Treat Your Gear: Use products containing 0.5% permethrin on clothing, boots, and camping gear. Permethrin binds tightly to fabric fibers and remains effective through multiple washings. Never apply permethrin directly to skin, as it is formulated specifically for textiles. Pre-treating socks, pants, and sleeves provides a chemical barrier that either repels ticks or kills them on contact.
- Wear Protective Clothing: Opt for long-sleeved shirts and long pants tucked into your socks. Light-colored clothing makes ticks easier to spot before they find bare skin. Consider purchasing outdoor clothing with built-in permethrin treatments for seamless protection during extended hikes.
- Stay on Trails: Avoid walking through tall grass and dense brush where ticks live. Ticks typically quest within the first 2-3 feet of the ground, so staying on cleared, well-maintained paths significantly reduces exposure risk.
- Perform Tick Checks: After coming indoors, thoroughly check your body for ticks, paying close attention to armpits, the groin, behind the knees, in and around the ears, and in your hair. Showering within two hours of coming indoors can help wash off unattached ticks and gives you an opportunity to inspect hidden areas. Tumble-drying clothes on high heat for 10 minutes will kill ticks that survived the washing process.
- Protect Your Pets: Use veterinarian-recommended tick prevention products on your pets, as they can bring ticks into your home. Regular grooming and vacuuming high-traffic pet areas reduce the likelihood of indoor infestations. Consult your vet about oral or topical preventatives that target multiple tick species common to your geographic region.
Creating a tick-safe perimeter around your home also contributes significantly to long-term prevention. Keep lawns mowed short, remove leaf litter, place wood chips or gravel borders between lawns and wooded areas, and discourage deer visitation with fencing or deer-resistant landscaping. These environmental modifications disrupt the tick life cycle and reduce local population densities over time.
Frequently Asked Questions
Do I need to save the tick for testing after removal?
Saving the tick is generally optional but can be helpful in specific scenarios. Commercial tick testing exists, but results often take several days to a week, which rarely influences immediate clinical decision-making since symptoms dictate treatment anyway. However, if you live in an area with high Lyme disease prevalence and the tick was identified as a blacklegged tick that was visibly engorged and attached for more than 36 hours, a healthcare provider might use the species identification to guide prophylactic doxycycline treatment. If you choose to save it, store it in a sealed container with a slightly damp paper towel in the refrigerator. Do not freeze it, as ice crystals can destroy the specimen and hinder laboratory analysis.
How long should I monitor my health after a tick bite?
You should actively monitor for signs of tick-borne illness for 30 days following the bite. The incubation periods for common diseases vary: Lyme disease typically presents within 3 to 30 days, Rocky Mountain spotted fever within 2 to 14 days, and Ehrlichiosis within 1 to 2 weeks. Keep a daily symptom journal noting any new rashes, fevers, chills, severe headaches, or unexplained fatigue. If you develop a expanding red rash, particularly one that clears in the center, or experience flu-like symptoms during peak tick season, seek medical evaluation promptly. Early intervention is critical, as delayed treatment can lead to chronic joint, neurological, or cardiac complications.
Can a single dose of antibiotics prevent Lyme disease?
In certain high-risk situations, a single dose of doxycycline may be prescribed as prophylactic treatment. According to IDSA and CDC guidelines, prophylaxis may be offered if all of the following are met: the attached tick is identified as an adult or nymphal Ixodes scapularis tick, the tick has been attached for 36 hours or more (based on degree of engorgement or certainty of time of exposure), prophylaxis can be started within 72 hours of tick removal, the local rate of infection of these ticks with B. burgdorferi is 20% or higher, and doxycycline is not contraindicated for the patient. It is crucial that this decision is made by a qualified healthcare provider who can assess your specific exposure risk, medical history, and regional epidemiological data.
Are children and pregnant women at higher risk from tick bites?
Children and pregnant women face unique vulnerabilities regarding tick-borne illnesses. Children are more likely to have tick bites on their scalps, necks, and behind the ears due to their proximity to the ground and playing habits. Their developing immune systems may also react differently to certain pathogens, and some antibiotics (like doxycycline) were historically avoided in young children, though recent CDC guidance indicates short courses of doxycycline are safe and effective for children of all ages with suspected tick-borne diseases. Pregnant women are not at increased risk of becoming infected, but some tick-borne diseases can potentially cross the placenta or cause severe maternal complications. Pregnant individuals bitten by ticks in endemic areas should promptly consult an obstetrician or infectious disease specialist for tailored monitoring and safe treatment protocols.
Can ticks survive indoors and infest a house?
While most tick species that bite humans (like the blacklegged tick or American dog tick) require humid outdoor environments to survive, certain species, like the brown dog tick (Rhipicephalus sanguineus), can complete their entire life cycle indoors and infest homes, especially where dogs are present. Hard ticks generally cannot reproduce in the dry air of typical household environments, so a single tick brought in on clothing is unlikely to start an infestation. However, if you discover multiple ticks indoors, it may indicate a wildlife host (like mice, raccoons, or pets) is accessing your home. Thorough vacuuming, washing bedding in hot water, and treating pets with veterinary-approved preventatives will resolve most indoor tick concerns. If an infestation persists, professional pest control may be necessary to address environmental reservoirs.
Conclusion
Ticks are a reality of spending time outdoors, but they don't have to ruin your adventures. By being prepared with a pair of fine-tipped tick removal tweezers and knowing the proper technique, you can handle any tick encounter safely and effectively. Understanding the biology of ticks, recognizing the critical window for removal, and avoiding dangerous folklore remedies are all essential components of outdoor health literacy. Remember the key steps: grasp close to the skin, pull straight up with steady pressure, and clean the area afterward. By practicing prevention, maintaining a well-stocked first-aid kit, and staying informed about regional tick risks, you can enjoy nature with confidence and peace of mind. Stay vigilant, check regularly, and never hesitate to seek professional medical advice if symptoms arise. Your proactive approach is your strongest defense against tick-borne diseases.
References: [^1]: Centers for Disease Control and Prevention (CDC). (2023). Tick Removal. Retrieved from How to safely remove a tick [^2]: Centers for Disease Control and Prevention (CDC). (2024). Tick Bite Prophylaxis. Retrieved from Lyme disease prevention and tick bite prophylaxis [^3]: Environmental Protection Agency (EPA). Find the Repellent that is Right for You. Retrieved from https://www.epa.gov/insect-repellents/find-repellent-right-you

About the author
Elena Vance, MD, is a double board-certified dermatologist and pediatric dermatologist. She is an assistant professor of dermatology at a leading medical university in California and is renowned for her research in autoimmune skin disorders.